Even though it can sometimes be difficult to get a decent exposure in a high school gym, no matter what high school you’re at, I’ve found one thing remains constant:
Unbelievable access.
If you’ve ever shot college or professional basketball, you know you’re told where you can shoot, or more specifically the long list of where you can’t.
With high school basketball, the only direction I’ve ever received from any official body is to be aware of where the referees are and give them space to move around the baseline.
As a photographer, that opens up a wide variety of angles and opportunities to make images.
I’m going to share my process to approaching basketball games.
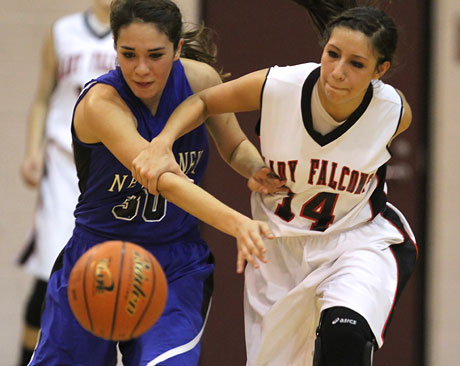
 ACROSS THE COURT: Shooting action across the court with a telephoto lens will give you a couple of different shots, such as rebounds, steals and general defensive plays. In these photos, I’m using my Canon 300mm lens. From this angle, you can capture a lot of the emotion that comes with steal and rebounds. Plus, fast breaks coming the other way should yield clean, unobstructed shots.
As a point of reference, I’ll shoot with two camera bodies (Canon 7D as my primary body and a 30D as a backup) with two-of-three lens (Canon 18-35mm, 70-200mm or 300mm) attached at any given point.
I’ll get my safe shots out of the way.
If I’m covering both teams, I’ll start with my 70-200mm f2.8 lens and split the first eight-minute half, so I’m on both sides of the floor in the first quarter, allowing me to get shots of the both teams’ offenses and defenses.
Typically, I’m stationed behind the basket, at either corner where the paint and court meet.
Once I’ve gotten some offensive shots, I’ll mix things up by using my 300mm to grab shots that are too far away for a 70-200.
Without switching to the other side of the court, I’ll use the 300mm to get defensive shots, both out on the perimeter and up in the air rebounding, of the team that was just on offense.
You can also get a nice shots of offensive turnovers.
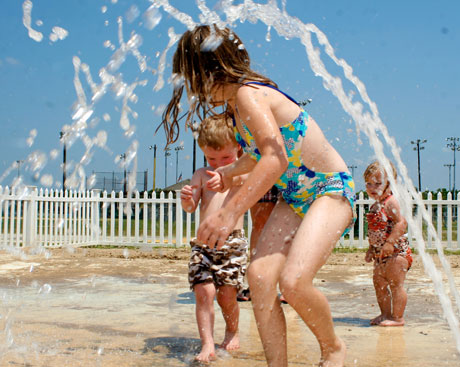
 FROM THE BASELINE: With a wide-angle lens, you can do a number of different things. If you put your camera on the floor and tilt it slightly upward, you can give a viewer a different angle on rebound shots. This angle is also nice because it gives the viewer a sense of place. For this kind of shot, I tend to focus about a foot in front of the basket and turn the camera lens focus to manual so all you have to do is position the camera and wait for the action. Another thing you can do is position yourself on the baseline just to the edge of the paint. What I’m looking for is a player to drive from the wing to the basket -parallel to you.
If you don’t have a long lens, you can get a similar shot — you just have to move your feet to get close.
There should be a sizable gap between the scorer’s table and the row of chairs for either team.
If you shoot on either side of the scorers table, you should be able to get close enough to get defensive shots, just be aware of where coaches and players are, as some coaches will like to pace around and players will check-in at the table to sub-in.
Now that you have your safe shots, it’s time to play.
Unlike my safe shots, I’m going for low-probability, high-yielding positions.
By this I mean I’m looking for shots that I may have to be patient to get.
Remember, I already have my safe shots, so I know if I go a quarter and a half with nothing decent to show, I’m all right.
I’ll go for a couple of different shots: low-angle shot below the basket, high shot from the stands, long lens at mid court, etc.
Below basket:
This type of shot can give you a sense of place, as well as an appreciation for the athleticism players have.
I’ll point the focus of my camera with my wide-angle lens at a usually a foot or so in front of the basket. I’ll turn the lens focus from automatic to manual so the focus won’t change and lay my camera on the ground at a slight upward angle. I’ll shoot a photo to check the composition and wait for a rebound, fast-break layup, etc., to happen in front of me.
In the stands:
The great thing about shooting from the stands is how it cleans up your backgrounds and helps with your exposure, and you don’t have to necessarily have a 300mm to get shots from higher up. Even a 70-200mm lens from even a few rows up can help give you a difference vantage point.
As a bonus for shooting higher up, you can get the light from the gym shinning more directly on players’ faces as they look toward the basket filling in shadows you might have seen if you shot from the floor level.
 FROM THE STANDS: Shooting from the stands will not only clean up the background, but also show you the faces of players as they battle for rebounds or go up for shots you wouldn’t see from the floor. From the stands I switch off between using my 300mm lens and my 70-200mm lens. As an added bonus, you can also get a better handle on what teams are doing both offensively and defensively, which can help you anticipate action.
You also see expressions as players go up for shots and rebounds that you may not see from the floor level.
From this point of view, I’m looking for expression and to some degree a variation of shots I get from the floor.
The other thing that can help you from this angle is you can see beyond just the pile of bodies in front of you.
In addition, it’s easier to understand plays and defensive schemes from that angle, allowing you to anticipate what will happen when and get a feel for players’ tendencies.
Images, such as player’s diving out of bounds, can be enhanced depending on your vantage point.
From higher up, you can see that play develop easier than you can from the floor.
If you get bored, you can always try other things, such as shooting completely wide angle for a while, or going super-tight from the baseline.
Mix it up, have fun and enjoy the freedom.
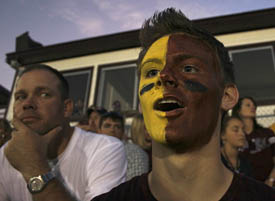
 Photo by Jason Fochtman
 Photo by Jason Fochtman